Last September, Slack released Clips, allowing users to capture video, audio, and screen recordings in messages to help distributed teams connect and share their work. We’ve continued iterating on Clips since its release, adding thumbnail selection, background blur, and most recently, background image replacement.
This blog post provides a deep dive into our implementation of background effects (background blur and background image replacement) for browsers and the desktop client. We’ve used a variety of web technologies, including WebGL and WebAssembly, to make background effects as performant as possible on our desktop platforms.
Pipeline introduction
Because of the nature of real-time video processing, we need to ensure that video frames are rendered with minimal latency and without interruption. To achieve this, we’re leveraging experimental technologies to offload the processing workload to a worker thread. This makes the rendering pipeline less prone to frame drops due to background activity, such as message processing, in the main thread.
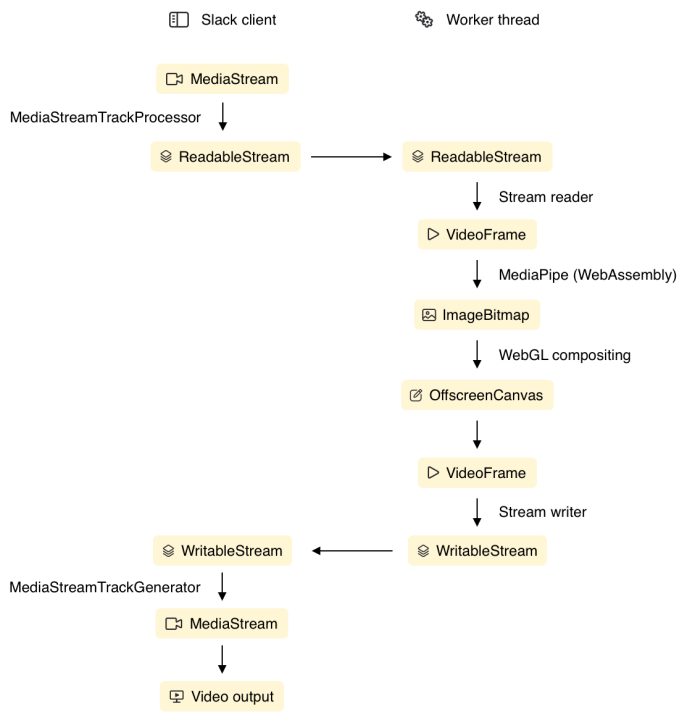
We read from webcam and screen capture video feeds using the Media Streams API. Individual video frame data can be read directly from the stream using the experimental Insertable Streams API, which exposes the media stream as a readable stream of video frames.
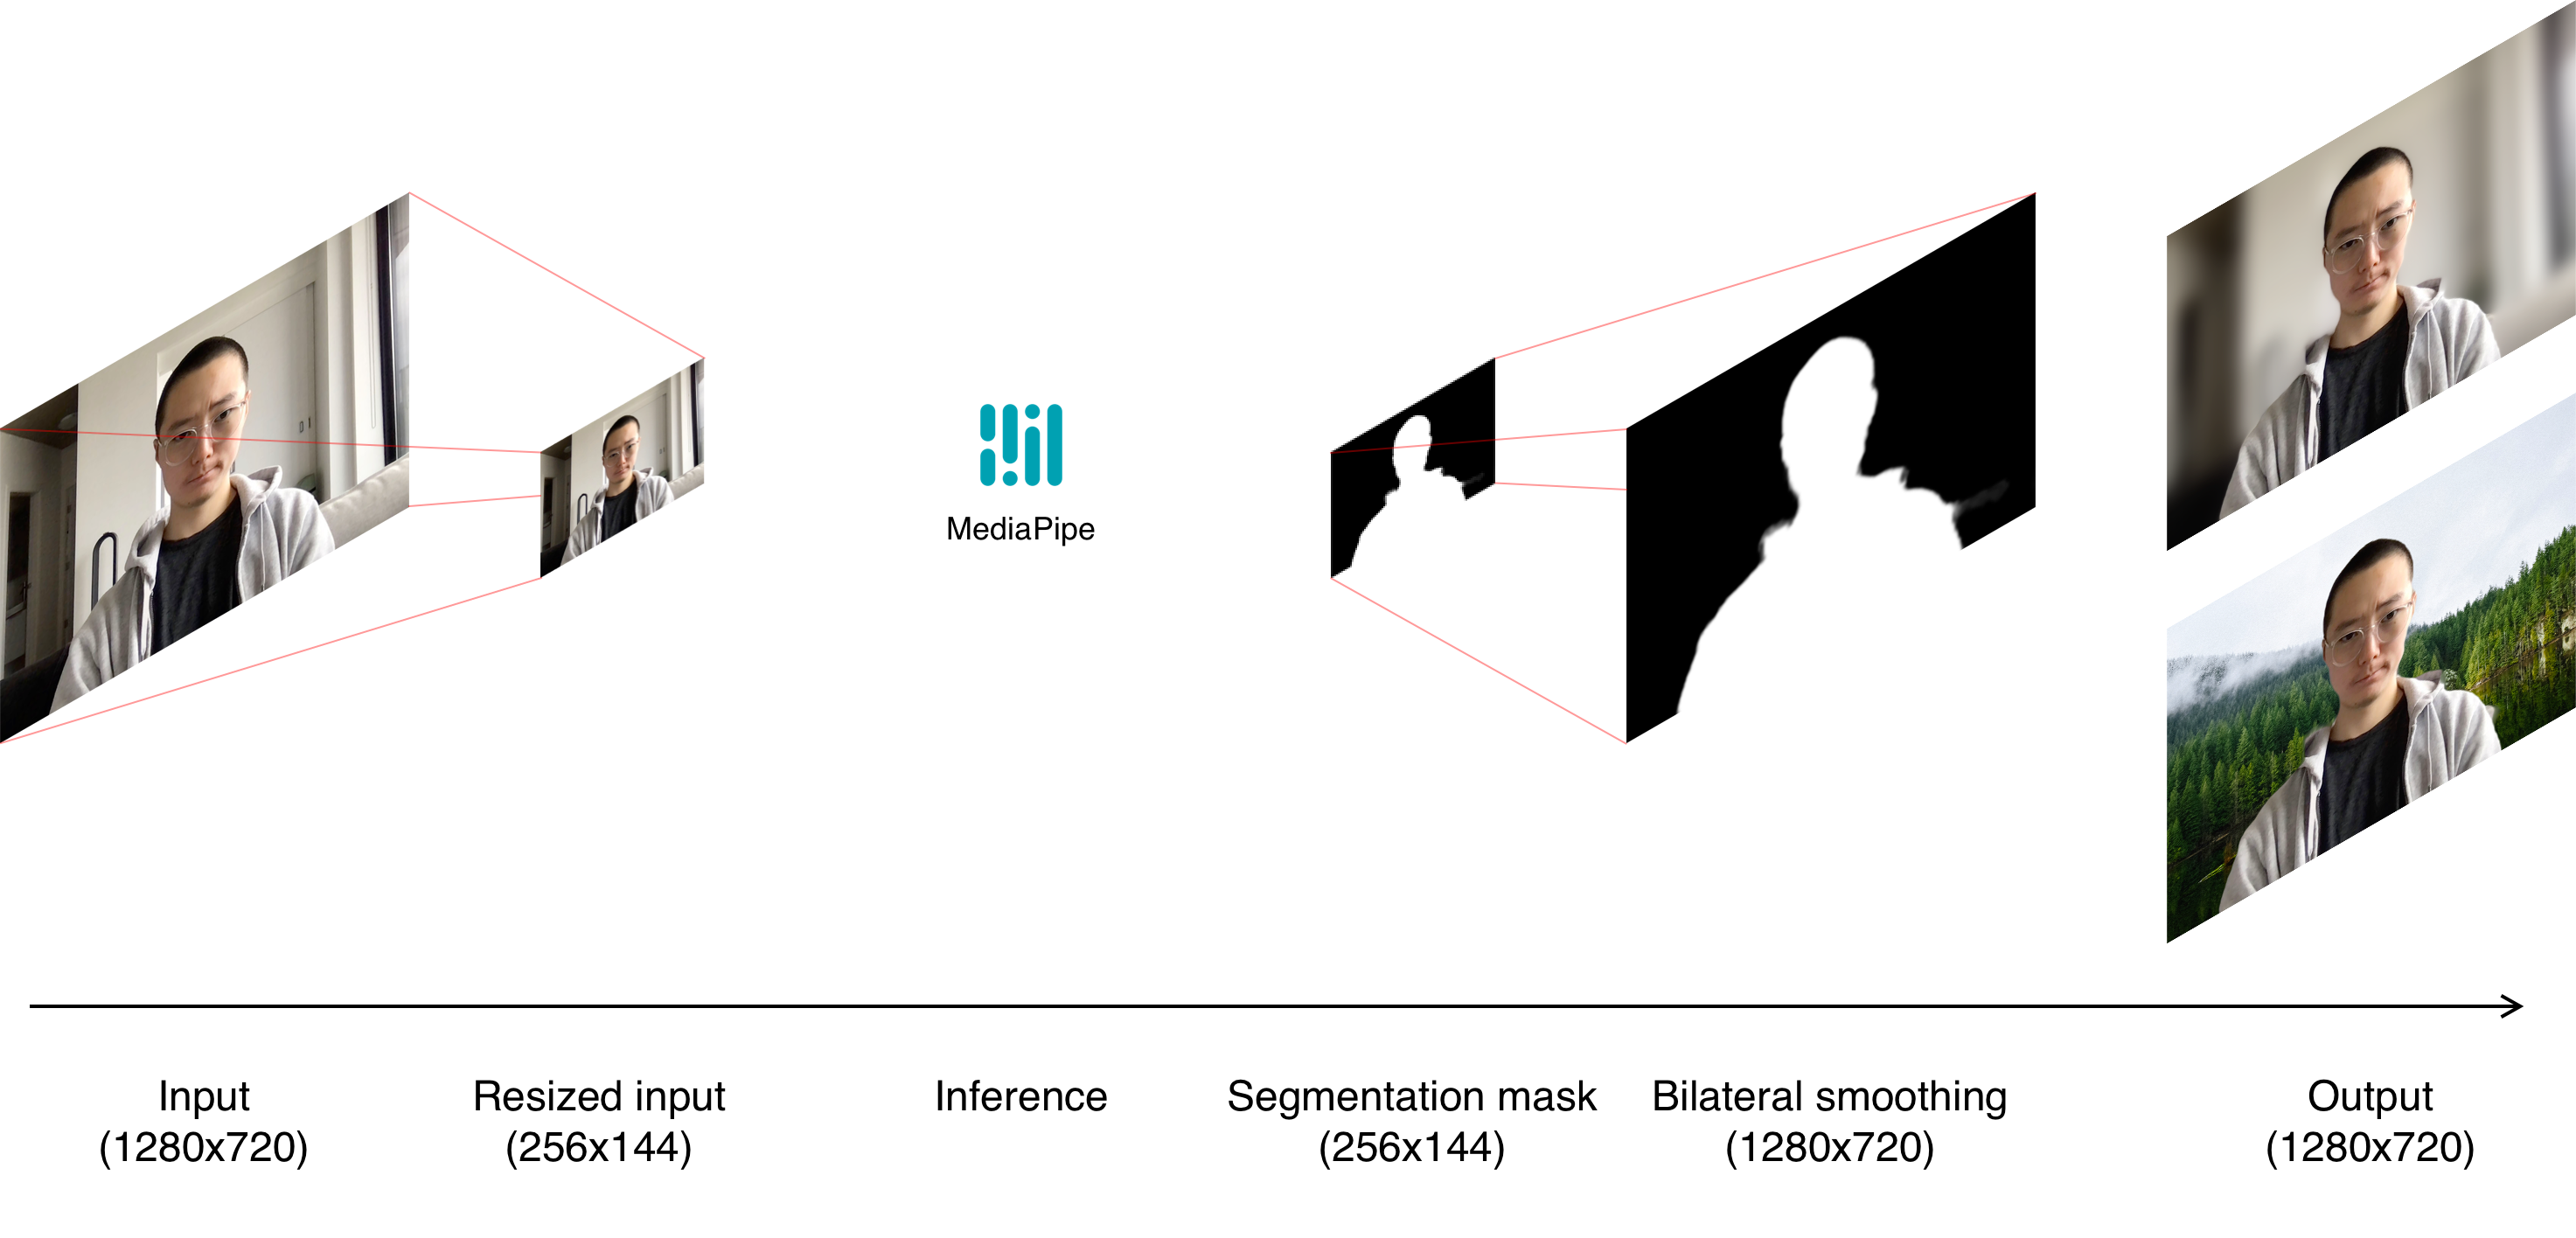
After reading data from the input streams, a render loop copies the video into a manipulatable source such as a canvas or ImageBitmap. We resize the image down to 256x144px, to make it suitable for the ML model we use for segmentation. Inference is performed by a WebAssembly module, to produce a segmentation alpha mask. The remainder of the pipeline combines the segmentation mask and input video to generate the desired effect. This composition is done in WebGL.
Segmentation model
We use Google’s open-source MediaPipe selfie segmentation model to extract an alpha mask from the input video. The ML model itself is a TensorFlow lite model, but MediaPipe’s NPM library provides a WebAssembly module with a JavaScript interface. We’re using the smaller “landscape” model, which takes a 256x144px image as input, and outputs a 256x144px alpha image. The landscape model is more performant than the general model (256x256px), but still large enough to produce an accurate mask.
Using the MediaPipe API is fairly straightforward. We instantiate the module, then for every rendered frame, we send the input video to the module as an ImageBitmap. The resulting alpha mask is returned through a callback function.
Each pixel in the segmentation mask represents the model’s confidence that the input pixel was part of a person; an alpha value of 1.0 means the model is confident that the input pixel is part of the person, a value of 0.0 means that pixel is part of the background, and any value in between corresponds to some level of uncertainty in the labeling.
Before settling on the MediaPipe model, we ran some prototypes with TensorFlow’s body-pix model. However, we found the MediaPipe model to be faster and more precise than body-pix. The MediaPipe model also has a proven track record, since it’s used in Google’s own Meet product for their background blur and background replacement features.
Bilateral smoothing
Before the result of the ML model is combined with the input video, we need to do some preprocessing: Upsampling the mask and applying a bilateral filter. The bilateral filter is used to smooth the edges of the mask, and reduce pixelation and noise. This process helps remove unwanted artifacts such as choppy edges or haloing around a person’s hair and face.

A bilateral filter is an edge-preserving blur. Given a certain pixel, it’ll perform a weighted blur where the weight is a Gaussian of both the distance and the difference in colour. So pixels that are similar will be blurred together, and pixels that are different will not, preserving edge contrast but reducing detail and noise.
Background blur
For background blur, we apply a weighted Gaussian blur with the video frame as the source and the smoothed mask as the weight. We compute the Gaussian blur by combining neighbouring pixels, weighted by the Gaussian function of the distance between the sampled location and the output location. In the implementation, we take three “steps” away from the source coordinate in each direction, where the size of the step is proportional to the blur radius for that pixel.
When applying the blur, we have to be especially careful to preserve the edges of the mask to prevent any haloing. This means that areas of the image where the mask weight is zero or near zero must not be blurred but also must not be sampled for other areas. So in addition to weighting the blur radius based on the mask value, we also weight each sample by the mask value at the sampled location. This prevents pixels outside the mask from sampling pixels inside the mask.
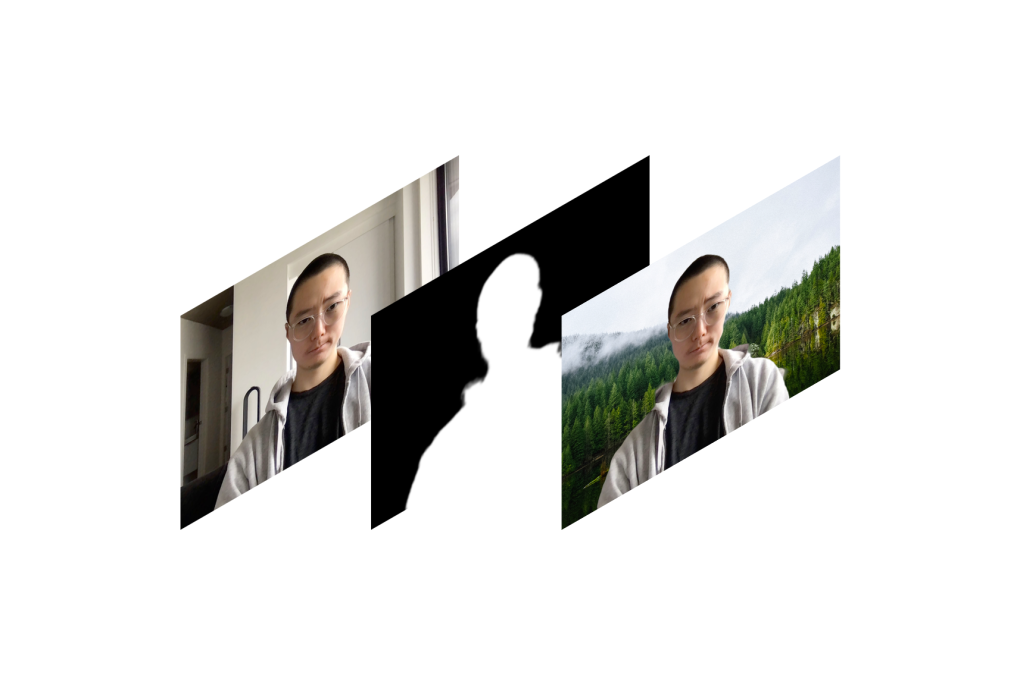
Background replacement
Background blur is relatively forgiving of errors and uncertainty, because blur gradients look natural — there’s nothing jarring about blurring part of the image by only half the radius of the background. However, with background image replacement users expect a crisp and well-defined edge. We can’t really get away with compositing the foreground and background at half opacity, which can end up making the person look ghostly.
The challenge with background replacement is to find some edge around the mask that we can use to divide the foreground and background. Ideally, this edge is exactly the edge around the segmented person. But because the model isn’t fully accurate, we have to make some tradeoffs.
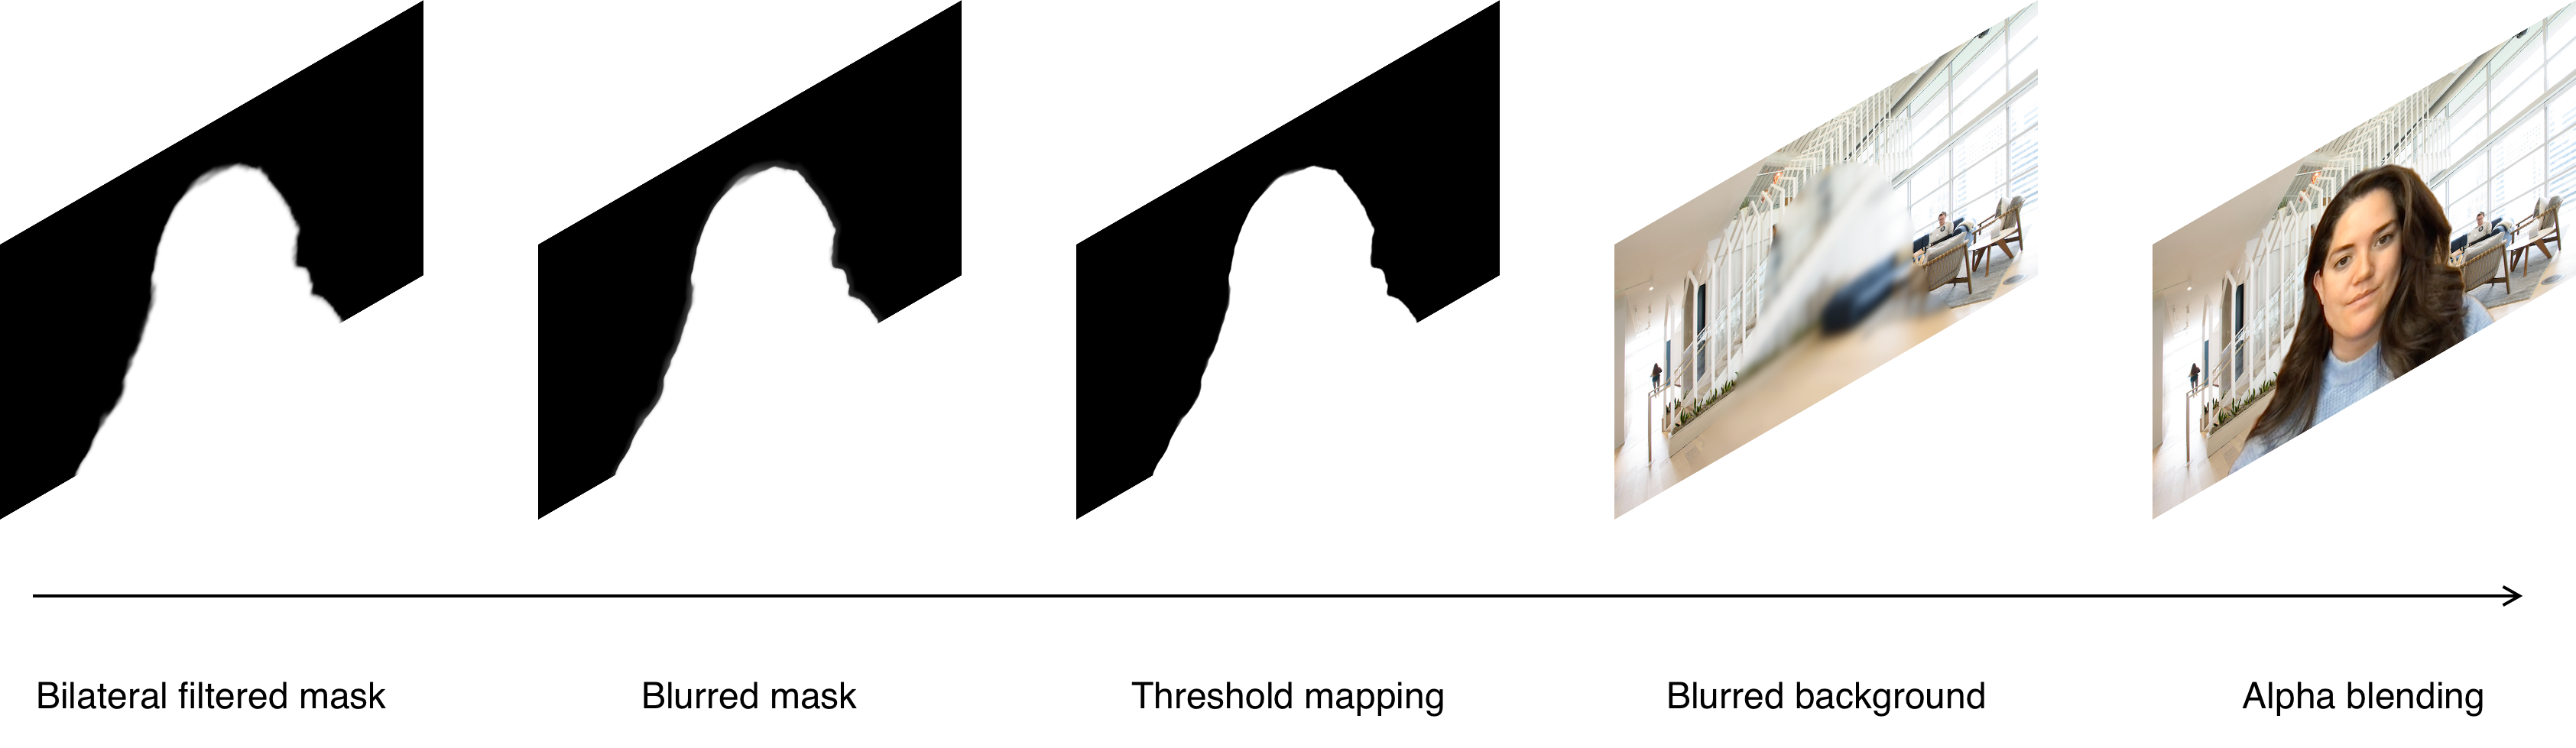
Our background replacement implementation is composed of four steps: First, we apply a weighted blur to the mask itself, where the weight is an inverted parabola centered around 0.5, maximizing the blur radius around areas of the mask where confidence is lowest. This helps smooth out areas of uncertainty in the mask, to reduce the effect of jagged edges and flickering.
Then, we compress the blurred mask output such that values over a certain threshold are mapped to 1.0, and values under a certain threshold are mapped to 0.0. In combination with the blurring step before, the result is a smooth but fairly sharp edge around the segmented person.
We also apply a weighted blur to the background image based on the mask. This helps remove detail in the background image from areas where the foreground and background are not fully opaque (e.g. where the mask alpha is near 0.5).
Finally, the blurred mask is used to mix the webcam video and the blurred background image. A simple alpha blend is used for this step.
Edge detection

During the prototyping phase for background replacement, we explored methods of merging edge data generated directly from the input video with the segmentation mask from the ML model.
While this approach was accurate at segmenting complex shapes like hands or hair, it often mislabeled or completely missed noisy parts of the image with a lot of edges, or areas with low contrast.
In the end, this method was promising, but didn’t produce reliable enough results to ship. It’s possible that with some changes, this approach could produce higher-quality segmentation than just using the segmentation mask from the ML model.
Looking ahead
While we’re pleased with the results so far, we believe there is still room to improve the quality and performance of the pipeline. We’re continuing to experiment with optimizations like re-ordering steps in the segmentation mask processing, using different blur radii, and changes to the threshold mapping stage.
Edge detection also seems promising, if we can find reliable methods of combining details from the detected edges with contextual information from the segmentation mask.
Let us know what you think about background blur and background image replacement in Slack Clips. And if you’d like to help us build the next generation of Slack features, we’re hiring!
Acknowledgments
We wanted to give a shout out to all the people and organizations that have contributed to this journey:
- Patrick Kane
- Johnny Rodgers
- Alfred Xing
- Julie Haynes
- Olivia Grace
- Issac Gerges
- MediaPipe